There is an increasing number of screenshot apps in Linux. While some of these apps perform well on the performance front, they fall short on features and functionalities.
Flameshot comes as an exception here. It is a free and open-source screenshot app that manages to strike the right balance between features and performance. So if you are looking for a screenshot app for your Linux desktop, Flameshot makes the right choice.
Keep reading as we check out instructions on setting up and using it on Flameshot and Linux.
What is flameshot?
Flameshot is an open-source screenshot software for Linux. It has a simple and intuitive interface that makes taking screenshots quick and easy.
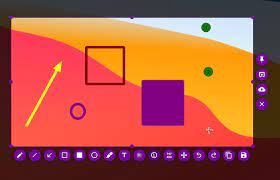
One of the notable features of Flameshot is its highly customizable interface that allows you to modify some of its visual elements to your liking. Similarly, the app also has a built-in editor, a handy feature that makes it easy to edit and annotate screenshots, so you don’t have to rely on other image editing software.
In addition, Flameshot also comes with support for CLI operations. So, if you’re a fan of the command-line interface, you can use Flameshot from the terminal and even bind it to a script to automate screen capturing.
How to Install Flameshot on Linux
Flameshot is very easy to install and is available for all major Linux distros. To get Flameshot on your computer, use the instructions below, depending on your Linux distribution.
If you are using any other Linux distro, you can install Flameshot using Snap or Flathub. However, for any of these methods, you need to have the appropriate package manager installed on your computer.
If it returns a version number, it indicates that Snap is present on your system. If not, follow the instructions in our detailed Snap Store guide to install the package manager first.
Similarly, you can install Flatpak using our guide on installing Flatpak.
Then, once you’ve got Snap or Flatpak on your computer, use the instructions below to install Flameshot.
Flameshot First Run and Configuration
With Flameshot installed, bring up the Applications menu, search for Flameshot and launch it. Once it’s on, right-click on the icon in the system tray and choose Configuration.
Here, you’ll see four different tabs, each of which allows you to customize different aspects of Flameshot.
Interface: Contains options that allow you to change the look of the app. Flameshot is set to use purple by default, but you can use the hue wheel to choose the main color and contrast color you like.
Similarly, here you can also adjust the opacity of the area outside the capture selection window by using the Opacity slider. Another option in the Interface tab is Button Selection, which lets you show/hide buttons in the Screen Capture window. To show/hide a button, select/deselect the checkbox next to it.
File Name Editor: It lets you choose a naming scheme for your screenshots. On this tab, you’ll see the various naming formats, each with a preview just below it. You can tap on a format to select it and modify it from the Edit field.
General: This lets you configure basic flameshot options. From here, you can enable desktop notifications for screen capture, launch Flameshot on startup, and import Flameshot configuration files, among other things. Similarly, you can also choose the path where you want to store the screenshots captured from this tab.
While you’re at it, one more thing we want you to do is to create a shortcut to bring up the Flameshot screen capture window. That’s because Flameshot doesn’t have a keyboard shortcut that lets you do it directly.
As a result, the default way to bring up the Capture window, which involves clicking its icon in the system tray and taking a screenshot from the menu options, can get tedious very quickly.
To do this, open Keyboard Shortcuts from the Applications menu. Click the plus (+) icon or the Add button to create a new shortcut.
Now, click on the blank/shortcut field next to the shortcut you just created and press the key or key combination you want to use to bring up the Flameshot Capture window. Press Enter. And that’s all, you now have a shortcut to quickly access the Flameshot Capture window.
How to Use Flameshot to Take Screenshots on Linux
Flameshot lets you capture screenshots using both the GUI and the CLI. Below are instructions on how to use each of them.
Capture Screenshots Using Flameshot GUI
To take a screenshot, press the Flameshot capture window shortcut you just created, and when it brings up the selection window, use the mouse/trackpad to select the area you want to capture on the screen